Opencart Customer Cart For Admin Installation And Operating Manual

Introduction:
Have you ever wished you could assist your customers more efficiently by managing their shopping carts directly from the admin panel? With the OpenCart Customer Cart for Admin module, you can!
This module is designed to address the gap between customer support and cart management, giving you full control to customize and optimize your customers’ shopping experience. Whether you’re helping a customer finalize their order or ensuring their preferences are accurately reflected, this module makes it all effortless. From adding or updating products to customizing details like quantity, color, or size, everything is just a few clicks away! It especially ensures:
- A user-friendly workflow for managing customer carts.
- Real-time updates that customers can instantly see in their accounts.
- An enhanced shopping experience that builds trust and satisfaction.
Ready to take your customer support to the next level? Let’s explore how this module can transform the way you interact with and assist your customers!
Features: Opencart Customer Cart For Admin
- Store administrators can directly manage and update customer carts.
- Admins can quickly find and select customers from a searchable list.
- Facilitates adding product-specific attributes like color, size, and other variations to match customer preferences.
- Changes made by the admin are immediately visible to customers in their shopping cart.
- Adds a “Customer Cart” menu to the admin dashboard for streamlined access and efficient cart handling.
- Enables admins to manage multiple products or quantities in one go, saving time and effort.
- Admins can add tailored product recommendations, enhancing the shopping experience.
- Customers can view the updated cart with precise details of products, pricing, and taxes.
- The admin can view the number of current customers who have products in their carts under the ‘Customer Cart’ section.
Note: Ensure your OpenCart version supports this module before installation.
Installation: Opencart Customer Cart For Admin
Steps to Install the Module
OpenCart’s Admin panel >> Extension >> Installer
- Access Extensions in Admin Panel: Log in to OpenCart’s Admin Panel, navigate to the ‘Extensions’ menu, and select ‘Installer’ from the dropdown.
- Upload the File: On the Installer page, click the file upload icon in the top-right corner. Ensure the file you want to upload is saved on your system with the extension ‘.ocmod.zip’.
- Install the Module: Once the file is uploaded, the module name will appear in the list. Click the green button next to it to complete the installation process.

Permission: Opencart Customer Cart For Admin
Now, grant the store administrators permission to edit the module.
OpenCart’s Admin panel >> System >> User >> User Groups >> Edit Administrator
- Go to OpenCart’s Admin Panel and click on ‘System’ to see the drop-down list.
- Then click on ‘Users’.
- A drop-down list will appear when you click on ‘Users.’ From the list, click on ‘User Groups.’
- Edit Administrator will allow permission for the user.

- Set access and modify permission for all related modules.

Configuration: Opencart Customer Cart For Admin
OpenCart’s Admin panel >> Extensions >> Extensions >> Choose The Extension Type >> Modules >> IML Customer Cart At Admin >> Install and edit.
- Go to OpenCart’s Admin Panel and click on ‘Extensions’ to see the drop-down list.
- Again, click on ‘Extensions’ from the drop-down list.
- Choose your extension type.

- Click on the green button and install the module.

- Click the edit button, set the status to ‘Enable’ and save.
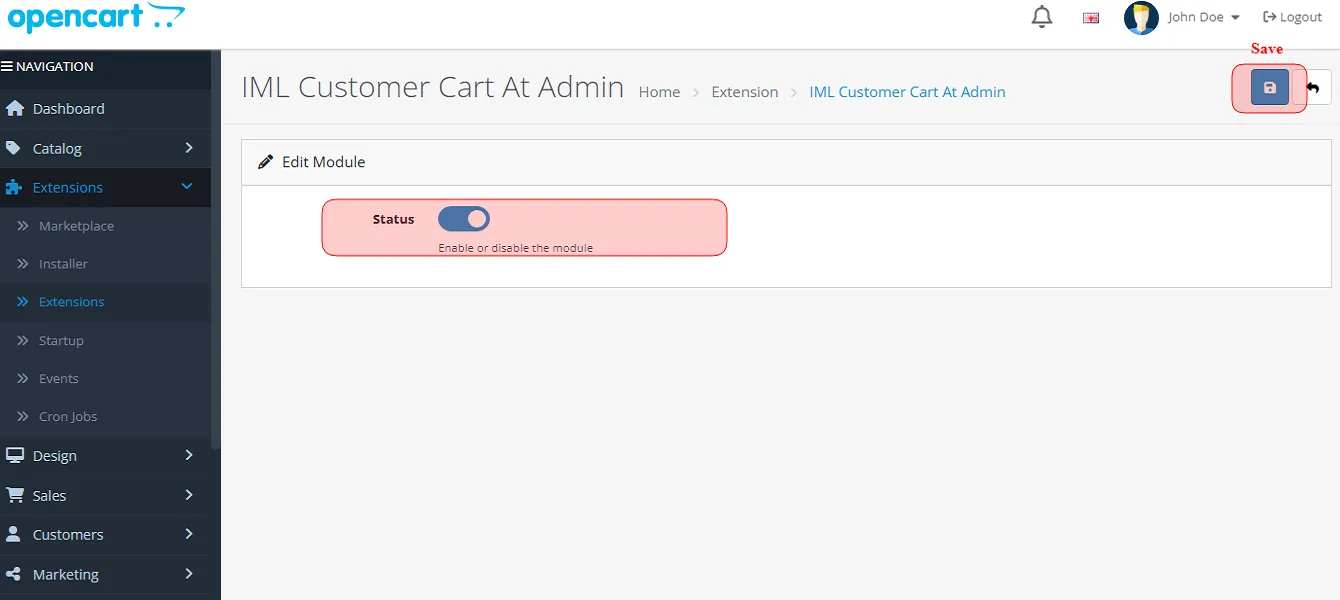
Finally, the module installation, permission, and configuration are completed with this step.
Admin Workflow
After the admin completes the configurations, an option(Customer Cart) will appear in the left menu. Check Below:

By Clicking on the customer cart option, you will find the registered customer’s name.

It is the leverage for the admin to be able to view the number of current customers in a single screen who have products added to their carts under the ‘Customer Cart’ section.

After selecting the right customer name, detailed data consisting of their details will appear, and you will also find some options to add the product type and quantities as you wish.
Note: Once the customer places the order from their side, the name of that particular customer will be removed from the Admin’s Customer Cart section.
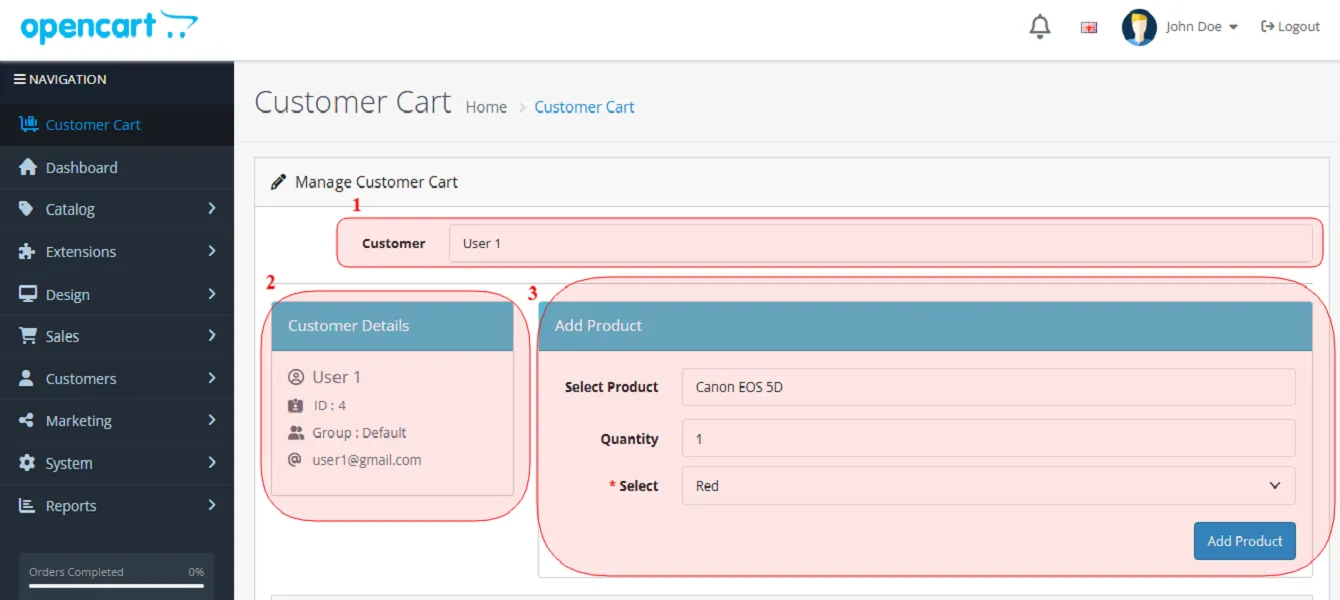
Details to Fill:
- Customer Name: Select the customer’s name to add products to their cart.
- Product Name and Details: Select the pre-decided product that you want to reflect on your customer’s cart and all the mandatory details regarding that particular product.
- Quantity: Always define the product quantity you have decided to add.
Note: Selecting the customer name will show you all the details regarding that particular customer. For example, name, ID, group, email ID, phone number, and personal details. (Follow the above highlighted section named as 2)
By clicking on the “Add Product” button, you will be able to add as many products and as much quantity as you want to add to the customer’s cart.
After adding the product name and quantity, the details regarding the product option will appear on your screen. You just need to select the right choice for the customer.

Buttons to select:
– Click “Restore” icon it once to update or refresh the changes
– Click “Crescent Moon” button to remove the added product
– Use “Bin” button to empty the whole cart
Customer Interface
Once the admin adds the selected products to the respective customer cart, Customers can find the added items in their shopping cart. Check the added image below for a better understanding;

Note: A customer can always update and remove the products by clicking the Refresh button and Remove button attached to the quantity section.
Most importantly, your customers can easily check the total amount, including taxes, and a decent section that mentions each unit price with each addition. This will help your customers understand you and calculate their investment better.